
Wafer designer - a cake wafer design in millimetres
Design a cake wafer on an A4 sheet: an image or a photo from the order clipped to the circle, curved text, an outline and decorations. A 1:1 PDF, PNG and JPG at 300 DPI.
Last updated:
Why a wafer designer
You design a cake wafer (wafer paper or a sugar sheet printed on an edible printer) without external programs. The canvas in the app is an A4 sheet (21 × 29.7 cm), and you give every dimension - the wafer diameter, the position and size of an image, the text size - in millimetres and centimetres, not pixels. You download the finished design as a 1:1 PDF or as a 300 DPI PNG or JPG and print it on a wafer sheet.
- The “Wafer designer” tab in the Cakes module (address /torty/oplatki)
- Available in every plan, from Podstawowy (Starter), by default for the Administrator and Seller roles (the “Wafer designer” permission in the permission matrix)
- A seller without access to the cake configurator goes straight to the designer after clicking “Cakes” in the menu
A new design and a wafer from an order
Click “New wafer”, enter the “Design name”, choose the “Round” or “Rectangular” shape and give the diameter or the width and height in cm. “Create and open the editor” creates the design with the wafer in the centre of the sheet. The fastest way to start is from an order: on the order card there is a “Wafer” button under each cake. The designer then opens with the order name, suggests the diameter from the weight or number of servings of that cake (based on the “Wafer diameters” table, described below), and the editor has a “Photo from the order” button.
- Open the order with the cake and click “Wafer” under the cake item
- Check the suggested diameter (you can always enter your own) and click “Create and open the editor”
- Click “Photo from the order” and pick a photo - a photo assigned to this cake comes first, marked “For this cake”
- Add text and decorations, download “PDF A4” and print at 100% scale
Tip: An A4 sheet is 21 cm wide, so with a 5 mm printer margin a round wafer can be at most 20 cm. The designer reduces a larger diameter to the largest possible one and shows a message.
The editor: images, text, decorations
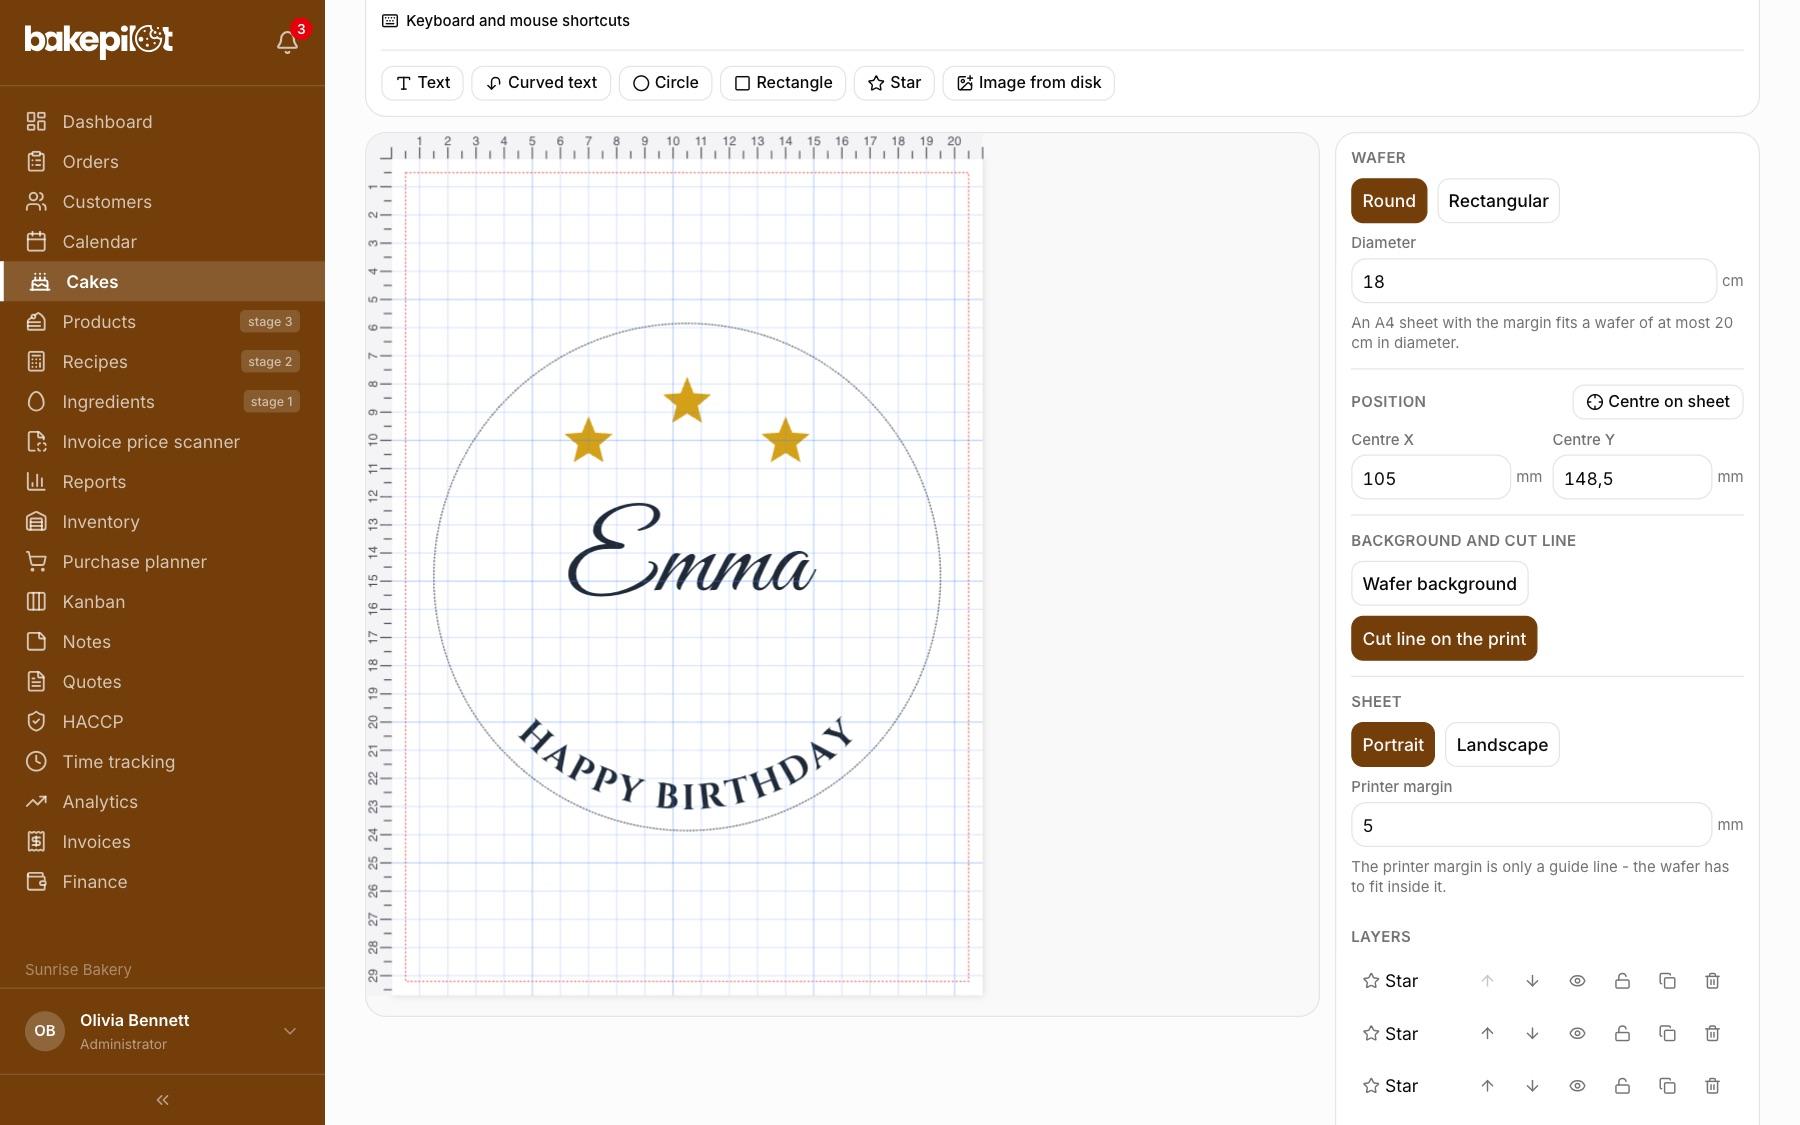
Above the canvas there are the buttons “Text”, “Curved text”, “Circle”, “Rectangle”, “Star”, “Image from disk” (JPG, PNG or WebP up to 10 MB; a HEIC photo from an iPhone is converted to JPG) and - in a design from an order - “Photo from the order”. Everything you add is clipped to the wafer shape: an image does not go outside the circle. You drag an element with the mouse or a finger, and the frame around the selected element resizes and rotates it.
- The panel on the right (on a phone, under the canvas) shows the “Position” of the selected element: X and Y are the distance from the element centre to the wafer centre in millimetres, plus “Rotation” in degrees and “Opacity” in percent - you enter the values to the millimetre
- “Size”: width and height in mm (image, rectangle), circle diameter, star radii and points; for an image the “Fill the wafer” button stretches it over the whole wafer, keeping the proportions
- “Curved text” runs along a circle: “Top of the circle” or “Bottom of the circle”, “Arc radius” in mm and the “Along the wafer edge” button; the text always reads from left to right, and rotation moves it around the circle
- Text: “Font” (eight typefaces with Polish characters, including Montserrat, Playfair Display, Cinzel, Dancing Script), size in points with the height in mm, bold, italic, colour, “Letter spacing”, “Letter outline” (colour, width) and “Shadow” (colour, blur, offset)
- “Circle” adds a thin outline 4 mm from the wafer edge; shapes have a “Fill” and an “Outline” with a colour and a line width in mm
- With nothing selected the panel shows the wafer: shape, diameter in cm, “Centre on sheet”, “Wafer background”, “Cut line on the print”, the sheet “Portrait” or “Landscape” and the “Printer margin”
Background eraser
The eraser removes a plain background from an image, e.g. the white background of a logo or a cake photo. Select the image on the canvas and click “Background eraser” in the panel on the right. In the window, click the background - it disappears together with similar colours, and the checkerboard shows what is already transparent. It all happens in your browser; the image never reaches a server.
- “Tolerance” - the higher it is, the more similar shades disappear
- “Connected only” on: only the area connected to the click disappears; off: every similar colour in the whole image
- “Undo” reverts the last click, “Restore original” goes back to the image before the eraser
- “Apply” puts the image without a background in the same place and size; “Undo” in the editor toolbar brings back the previous one
Tip: The eraser works best on a plain background. Cut out photos of people on a busy background beforehand in a graphics program.
Layers, grid and shortcuts
The “Layers” list shows the elements from the top: the “Up” and “Down” buttons change the order, and “Hide”, “Lock”, “Duplicate” and “Delete” act on a single element. The bar above the canvas has “Undo” and “Redo”, the construction grid choice (“No grid”, “Grid every 5 mm”, “Grid every 10 mm”), “Snapping” to the wafer centre and to the grid, and zoom. Above and beside the sheet there are rulers in centimetres, and a red dashed line shows the printer margin.
- Ctrl+Z undoes, Ctrl+Shift+Z or Ctrl+Y redoes, Ctrl+S saves, Ctrl+D duplicates, Delete removes the selected element
- The arrow keys move an element by 1 mm, with Shift by 10 mm, with Alt by 0.1 mm
- Dragging a corner of an image keeps the proportions, and with Shift you stretch it freely; a rectangle works the other way round - Shift keeps the proportions. Alt (Option on a Mac) resizes from the centre, Shift while rotating rotates in 15° steps
- Expand the full list of shortcuts under the toolbar: “Keyboard and mouse shortcuts”
- The design saves itself a few seconds after a change; the “Save” button saves immediately
PDF, PNG, JPG and printing at 100% scale
“PDF A4” downloads a page of exactly 210 × 297 mm with the design in the same place as on the canvas (a 300 DPI image). “PNG / JPG” downloads the whole A4 sheet (2480 × 3508 px) or the wafer only, both at 300 DPI. “Print” opens the PDF in a new browser tab. Always print at 100% scale (actual size), without fit to page - then the dimensions on paper match to the millimetre.
- Only the design goes to print: the grid, rulers, margin and selection frame stay on the screen
- “Cut line on the print” adds a thin grey outline of the wafer that helps you cut it out of the sheet
- In the mobile app, instead of “Print”, download the PDF or PNG and print from a computer connected to the edible printer
We keep a design for 5 days
We delete a wafer design automatically and permanently 5 days after it is created - it does not go to any archive. The date is shown next to each design on the list (“Deleted on …”) and above the editor: “We will delete this design automatically on … - download a PDF or PNG if you want to keep it”. Editing a design does not extend the date. The list in the tab shows the designs from the last 5 days with the “Open” and “Delete design” buttons.
Wafer diameters - your table
Under the list of designs there is the expandable “Wafer diameters” table: each row says that a cake of a given weight (kg) or number of servings gets a wafer of a given diameter (cm). The designer uses this table to suggest the diameter when you open it with the “Wafer” button from an order - first from the cake weight, and when there is none, from the number of servings (or persons). Between rows the diameter is calculated proportionally; outside the table we take the outermost row.
- Default values: 1 kg - 15 cm, 1.5 kg - 17 cm, 2 kg - 19 cm, 2.5 kg - 21 cm, 3 kg - 23 cm, and servings from Marta Mężyńska's table (a wafer 2 cm smaller than the cake, e.g. 24 servings - 19 cm)
- “Add row”, “Default values” and “Save table” are available to a role with the cake configurator permission (by default the Administrator); others see the table read-only
Tip: Every bakery has its own guidelines - enter yours and the suggestion will match your cakes. You can always change the diameter by hand in the design.
Frequently asked questions
Will the dimensions on the print match the design?
Yes, if you print at 100% scale (actual size), without fit to page. The PDF page is exactly 210 × 297 mm, and the design sits in the same place as on the canvas.
How long do you keep a wafer design?
5 days from creation. After that we delete the design and its images permanently, without an archive - download the finished wafer as a PDF or PNG.
How does the designer know which diameter fits the cake?
From your bakery's “Wafer diameters” table: the weight or number of servings of the cake in the order is converted into the wafer diameter. You can change the table, and you can always enter the diameter in the design by hand.